How to Install Shift Cable on 2008-2012 Mercury 15-20hp
The shift cable or shift linkage refers to the cable on the Mercury outboard motor that connects the gearshift or gear selector to the control box. The cable is responsible for shifting the engine into neutral, forward or reverse.
Use these instructions when installing the shift cables into the remote control. For reference, the shift cable is the first cable to move on the Mercury outboard engine when moving the control box out of neutral.
Note: This information applies to Mercury 15, 20 horsepower 4-stroke outboard engines from 2008 thru 2012.
Shift Cable Installation
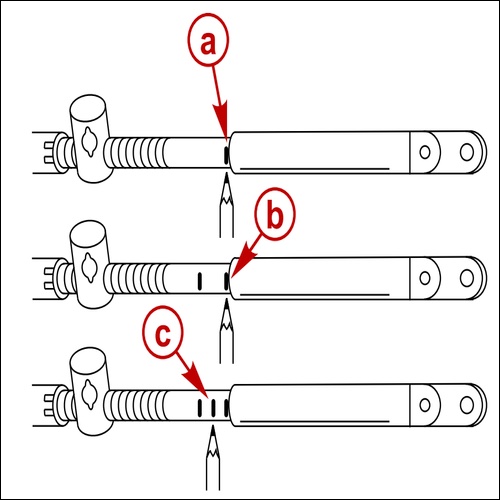
- Begin by locating the center point of the lost motion or slack that exist within the shift cables by using following these directions:
-
- Move the Mercury outboard remote control handle from the neutral position and shit it into forward position and then advance the handle to the full speed position. Next, at a slow speed, return the handle back to the neutral position. Be sure to place a mark (“a”) with a marker directly on the cable next to the end guide.
- Now change the outboard’s remote control handle from the neutral position into the reverse position and then advance the handle to full speed position. At a slow pace, return the handle back to its neutral position. With a marker place a mark (“b”) directly on the cable net to the end guide.
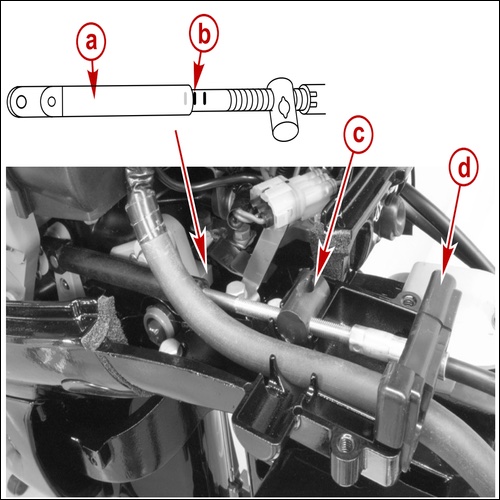
- Using the same marker, mark (“c”) midway between marks (“a” and “b”). Make sure you align the end guide with that center mark when you are installing the cable into the engine (see illustration).
- Position the Mercury motor’s remote control handle into neutral position.
- With your hands move the engine’s shift lever forward to gain additional clearance for attaching the shift cable.
- Now connect the sift cable to the engine’s shift lever using a washer and bow-tie retainer clip (see illustration)
- With your hands manually shift the Mercury outboard into neutral. At this point the propeller will rotate freely).
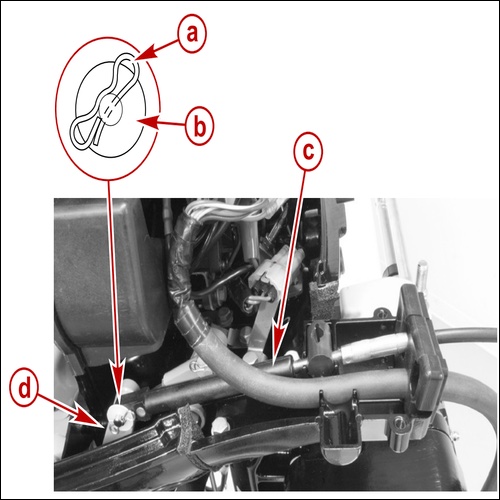
a – Bow tie Retainer, b – Flat washer, c – shift cable, d – Shift lever - Now adjust the cable barrel (see illustration) so the center mark on the shift cable is aligned with the end guide (see illustration) when the cable barrel is placed into the barrel receptacle.
- Position the Mercury outboard shift cable into the rubber grommet (see image) and then place or move the cable barrel into barrel receptacle.
- Now you will need to check the shift cable adjustments using the following directions:
-
-
- Shift the remote control into the forward position. This should cause the propeller shaft to become locked in gear. If it is not locked in gear, readjust the barrel closer to the cable guide.
- Next shift the remote control into the reverse position while rotating the propeller. At this point, the propeller shaft should be locked in gear. If it is not locked in gear, adjust the barrel further away from the cable guide. Repeat steps a through c.
- Lastly, shift the remote control back to the neutral position. The propeller shaft should now turn freely without any drag. If it does not turn feely without drag, adjust the barrel close to the cable guide. Repeat steps a though c.
-
It’s recommended you refer to the factory service manual when installing shift cables on a Mercury 15hp or 20hp engine. Additional procedures, pictures, illustrations and safety information may be present https://www.downloadpdfrepairmanual.com/2010-evinrude-e-tec-service-manual-40-50-60-75-hp/.